This is the first in a series of articles that looks at the Manufacturing module in Jiwa 7.
Overview
A Bill of Material also referred to as a Bill or BOM is a template or formula used to make a finished product or component that goes into the manufacture of another product.
In this article we look at the Bill of Materials form and how to create simple Bills.
Advanced functions and features are covered in separate articles this includes;
-
Production Areas and Lines,
-
Work centres, and
-
Sub-assemblies
Before we begin let's have a look at some of the manufacturing terms used in Jiwa.
|
Term |
Description |
|
Production areas |
Dedicated area in a warehouse/factory where an item is manufactured. For example if you manufacture doors and windows your warehouse/factory may have separate areas where each is manufactured, like
|
|
Production line |
Production lines contained within a production area. If we use the door and window example the Door and Frame Production area may have the following production lines;
|
|
Work Centre |
Processes or task associated with a production line. If we use the Door example the Sliding Doors production line may have the following work centres,
|
|
Stage |
Stages represent the steps in your manufacturing process and can be as simple or as complex as required. Each stage can have it's own components (inputs) that go into the manufacture of one or more outputs. Taking our door manufacturing process the bill of material may have the following stages;
At least one stage needs to be setup in a Bill of Material |
|
Sub Assembly |
A bill of material to create a component that is used in the manufacture of another component or a finished product. |
|
Inputs |
Components that go into the manufacture of another product |
|
Outputs |
The item that is produced at the end of the manufacturing process this can be a finished product or another component that is used to manufacture another product |
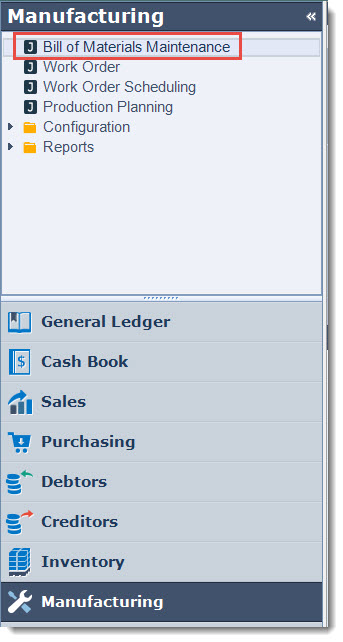
From the menu select Manufacturing | Bill of Materials Maintenance
From the menu ribbon select New

Header Information
The General section of the form is a summary of our Bill.
Give your Bill a number and description.

|
Field |
Description |
|
Bill No. |
This is a unique identifier for you Bill of Materials. Typically it is set to the output item. |
|
Description |
Bill of Materials description |
|
Production Area / Line |
This field is optional and only required if production areas and lines are being utilised. Production areas are created to provide more control over the manufacturing process, what gets manufactured and where by linking them to warehouses. This feature is optional and typically implemented were more control over the manufacturing process and work scheduling is required. Production areas, lines and works order scheduling is covered in more detail in another article. |
|
Max Prod. Capability |
This is the maximum number of output items that can be produced at the time you are working with the Bill of Material based on the quantities of input items that are available. This field is recalculated with the movement in your input items. |
|
Enabled |
When enabled the Bill of Material is active and is available for use on a works order. When this check box is unticked, the the Bill of Material is not active and can not be used on a works order. |
Details Tab
The details tab is divided into 3 key areas
-
Stages
-
Inputs
-
Outputs
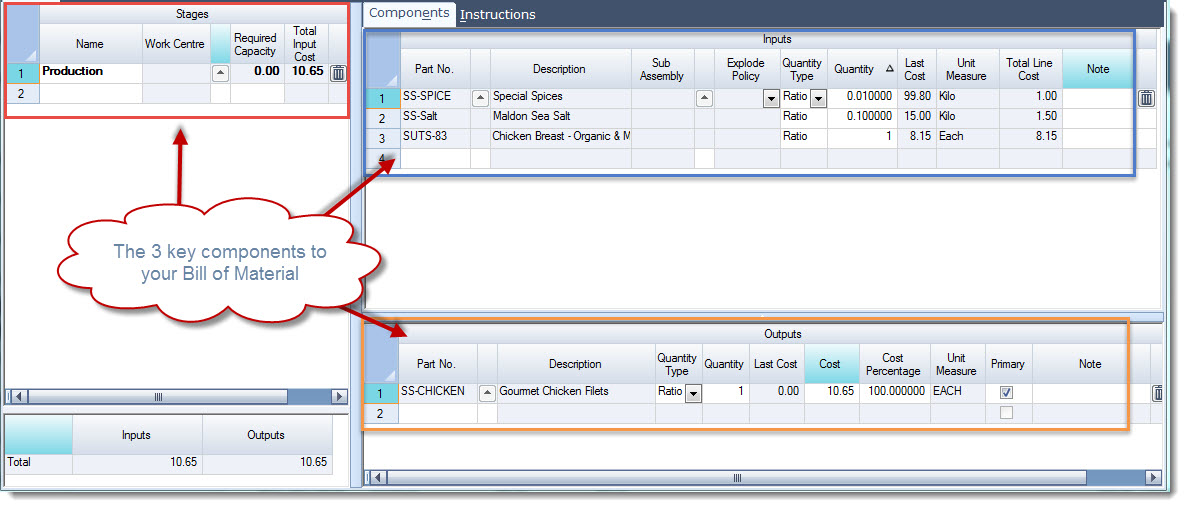
Stages
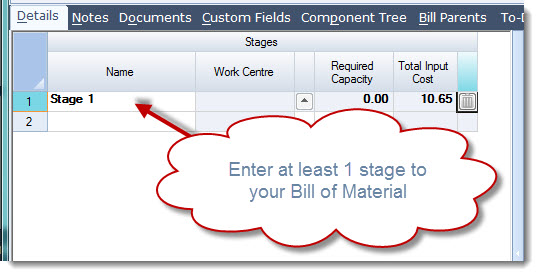
Jiwa requires at least 1 stage to be set-up in a Bill.
Enter in a stage description in the Name field, for simple Bill's this could simply be Stage 1
|
Field |
Description |
|
Name |
Stage name Your Bill of Material must have at least 1 stage |
|
Work Centre |
Select the Work Centre that is applicable to this stage. This field is not mandatory and can be left blank when creating simple Bill's. Work centres are covered in more detail in separate articles. |
|
Required Capacity |
This field is only enabled when a Work Centre is selected and represents the time required to complete the stage for a single unit. This field is greyed out when a work centre is not selected |
|
Total Input Cost |
This is the total cost of the stage based on the stage inputs |
Inputs
Components
Add the input components that are required in the stage item by clicking on the lookup icon next to the Part No. field
Check the quantity type and set the quantity to be used.
If the item has a sub-assembly select the applicable sub-assembly.
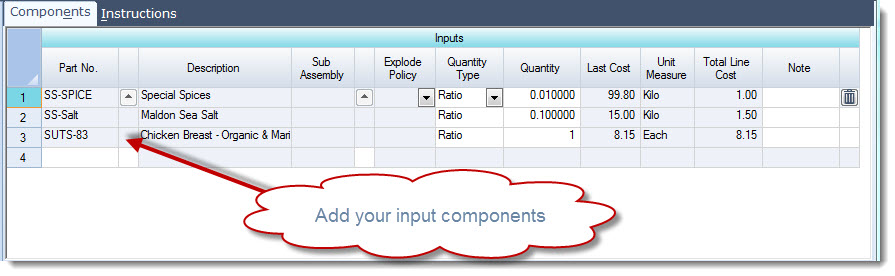
|
Field |
Description |
|
Part No. |
Input item part number |
|
Description |
Part number description |
|
Sub-assembly |
Select the applicable sub-assembly if the component is also a manufactured item. Hint: You will notice that the Explode Policy field is activated if there is a sub-assembly associated with the input item. |
|
Explode Policy |
The Explode Policy controls when the works order is created for the sub-assembly.
|
|
Quantity Type |
Select how the input item is to be consumed when a works order is created;
|
|
Quantity |
Quantity required of the input item in order to produce the output quantity. |
|
Last Cost |
Last cost from Inventory maintenance |
|
Unit Measure |
Unit from Inventory maintenance |
|
Total Line Cost |
Last Cost x Quantity |
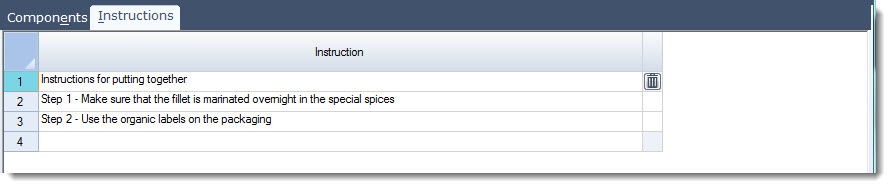
Instructions
This tab allows you to add instructions for each production stage which can then be added to a customised works order report.
Outputs
Add the output item or items that will be built in the stage by clicking on the lookup icon next to the Part No. field
Check you quantity type and set the quantity to be built.
If there is more than 1 input item to be built set the cost percentage.
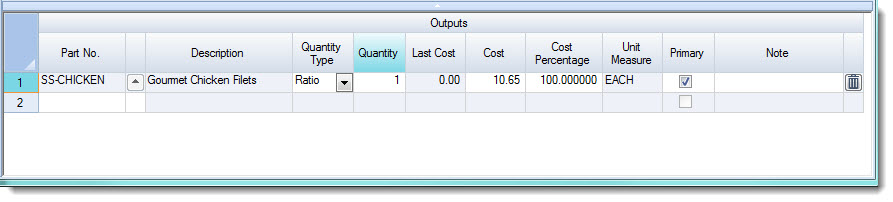
|
Field |
Description |
|
Part No. |
Input item part number |
|
Description |
Part number description |
|
Quantity Type |
This is only applicable if there is more than 1 output item. This option determines how the costs are split between the output items.
|
|
Quantity |
Output quantity |
|
Last Cost |
Last cost from Inventory maintenance |
|
Cost |
Sum of the component costs across all stages |
|
Cost Percentage |
This field is only applicable if there is more than 1 output item on the Bill and controls how the total input costs are apportioned across the output items. |
|
Unit Measure |
Unit from Inventory maintenance |
|
Primary |
|
Select Save from the menu ribbon to add your new Bill of Material.
Continue to add other stages if required.
Other Tabs
|
Field |
Description |
|
Notes |
This tab allows you to enter notes about the Bill such as updates to the bill or changes that have been made to the bill. |
|
Documents |
This tab allows you to attach documents to the Bill such as drawings |
|
Custom Fields |
This tab contains additional information that needs to be captured on a Bill via custom fields |
|
Component Tree |
This tab displays all the components contained in the Bill by stage including sub-assemblies |
|
Bill Parents |
This tab displays the items that the current Bill is a sub-assembly of |
|
To Do |
This tab allows you to add tasks specific to the Bill |
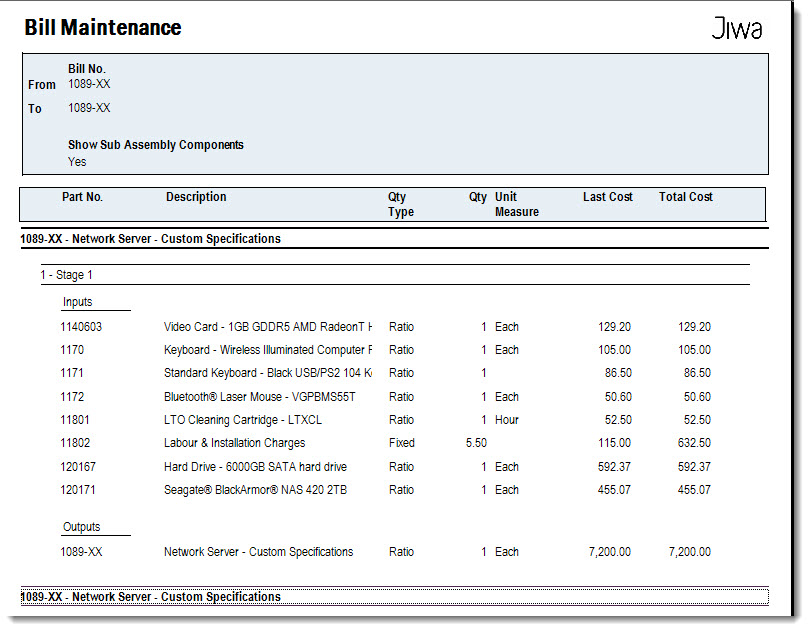
Reporting
To print out the Bill Maintenance report from the menu ribbon select Print | Bill Maintenance

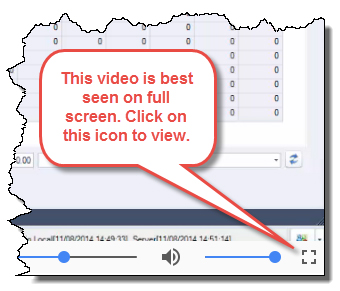
This video is best seen on the full screen. Just click on the icon at the bottom right of the video (see image below).
To exit full screen just press escape