In this article we will look at using the Landed Cost module in Jiwa to bring stock in where additional costs need to be added to the supplier cost price in order to calculate a landed cost.
Overview
The Landed Cost module is not restricted to imported stock but can also be used for local purchases where additional costs such as freight need to be added to the cost of the items.
The primary functions of the module are to;
-
Calculate landed cost,
-
Manage shipments - a shipment can represent a container/(s) or truck carrying goods right from a single purchase order through to multiple suppliers with multiple purchase orders,
-
Manage multiple book ins (stock receipts) against a single shipment, and
-
Provide flexibility in when stock is received and when the shipment is finalised
The following digram provides an overview of the shipment process flow which will be covered in this article.

Creating a Shipment
A shipment can be created as soon as notification is received confirming your shipment details
Select Purchasing| Landed Cost | Shipments
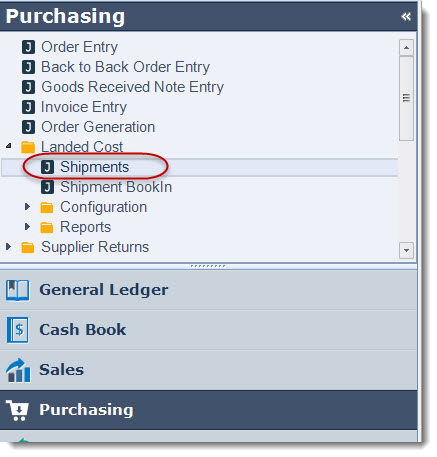
Select the New icon from the menu ribbon to create a new shipment

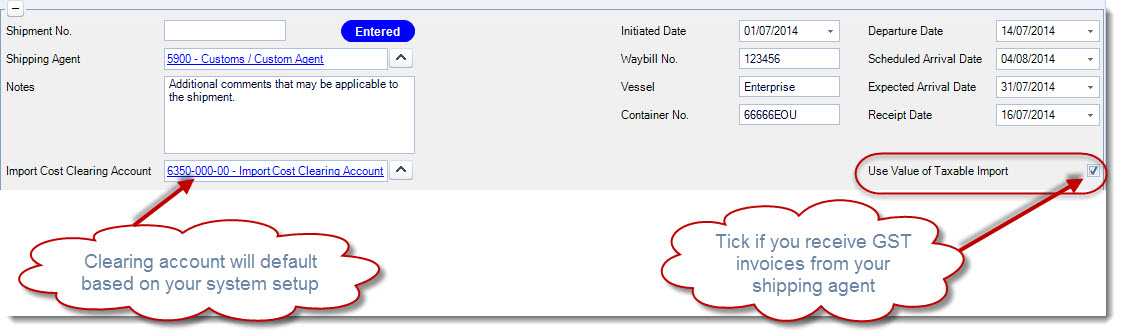
Enter in your shipment details in the header section of your shipment.
The shipment field can be left blank if you want Jiwa to assign a number automatically.
|

|
Ensure you tick the Use Value of Taxable Import check box if you receive invoices from your shipping agent for the notional GST value of your imported goods as determined by the Customs office. This option must be ticked before the shipment is committed for book-in. This field is disabled once your shipment is committed for book-in. |
Select the Save icon to save your changes
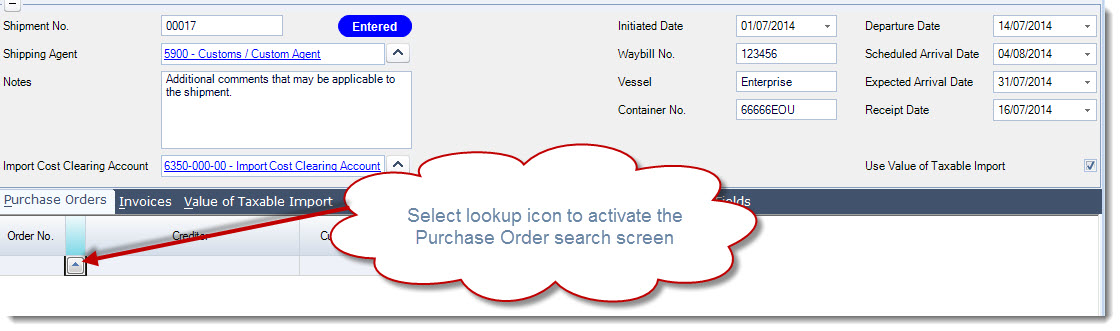
Adding Purchase Order/(s) to your Shipment
Once we have created our new shipment we can start adding our purchase orders to the shipment.
Making sure you are on the Purchase Orders tab and select the order lookup button to activate your purchase order search screen
Select the orders that are applicable to your shipment from you purchase order search screen.
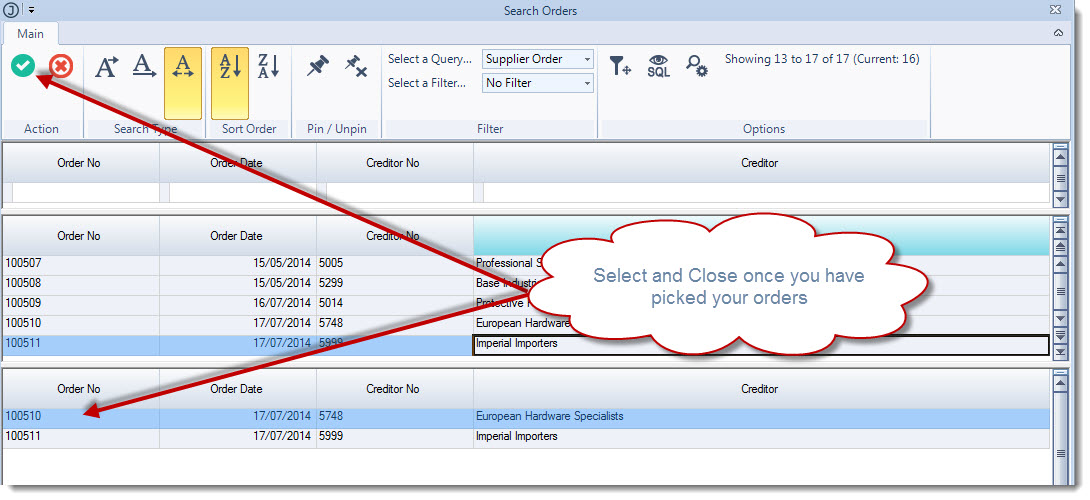
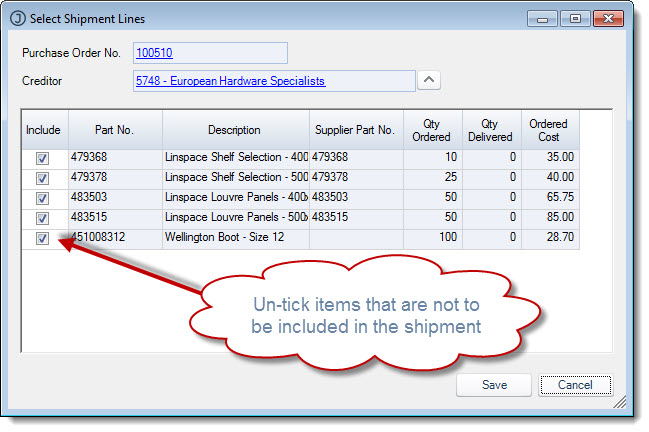
Once you have selected your purchase orders click on the Select and Close icon, this will then activate the Select Shipment Lines screen for each purchase order you have added to your shipment.
This screen allows you to confirm the inventory items on each purchase order that are to be to be included in your shipment.
To exclude an item or items from the shipment simple un-tick the Include check box next to the parts you which to exclude.
When you have reviewed the parts select Save.
Once you have reviewed all the purchase order lines you will be returned back to the shipment where the purchase orders will now be displayed.
Save your changes
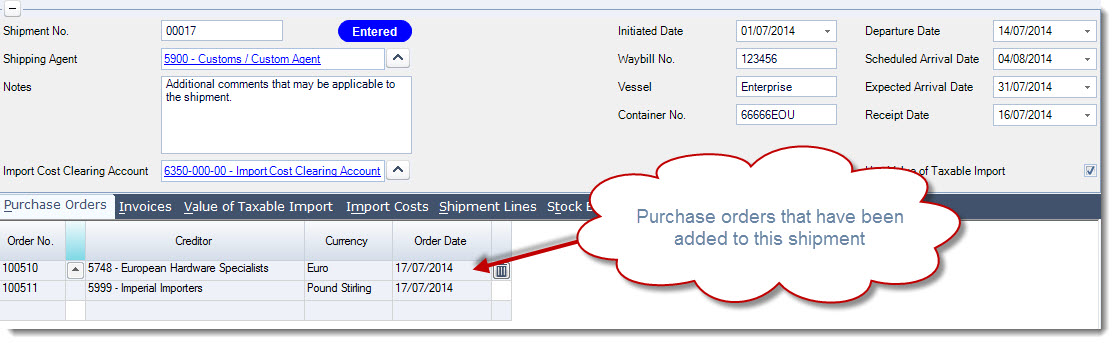
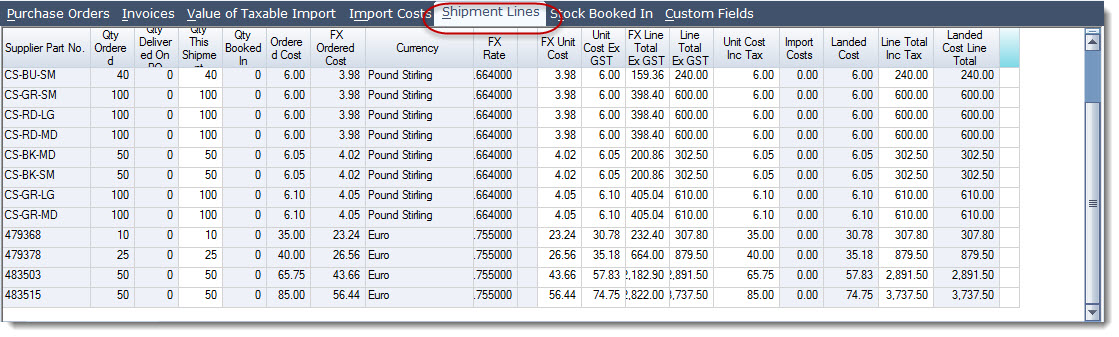
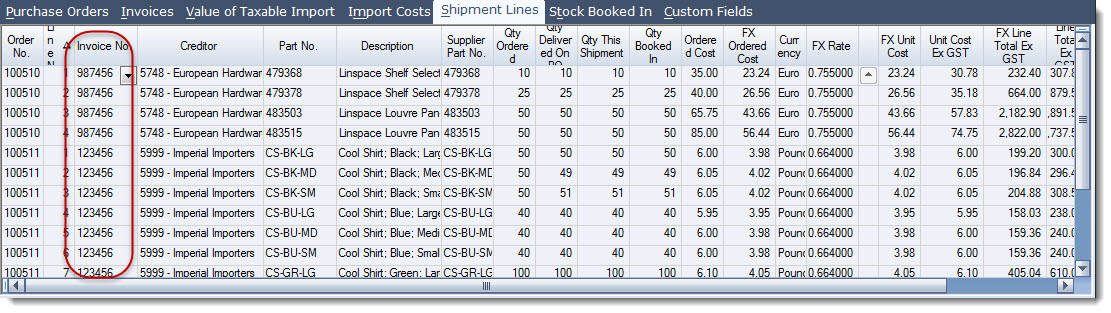
To view all the inventory items that are expected on this shipment select the Shipment Lines tab. Inventory lines can also be removed from the shipment through this tab.
You will also notice that a line for each creditor has been added to the Invoices tab, allowing creditor invoices to be raised quickly once the stock has been booked in.

|
|
NOTE: It is the FX rate assigned to the creditor on the Invoices tab that is used when calculating unit costs ensure that this rate is correct. |
Adding Shipment Costs and Calculating Landed Cost
When you have received all your shipping documents and agent invoices your shipment costs are added to your shipment.
Estimated import costs can be added to your shipment if you have not received your agents invoices.
Select the Import Costs tab on your shipment to add your agents costs to your shipment.
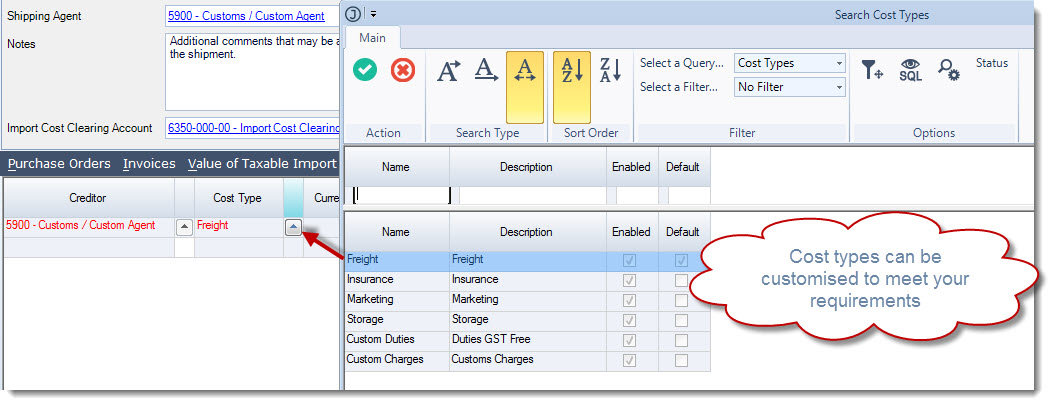
Select your creditor account, then click on the lookup icon next to the Cost Type to bring up your Cost Types search screen.
Select the applicable cost type using the lookup icon.
Enter in your costs ensuring that you have applied the correct GST rate to each cost line.
Repeat this process for each cost type as per the example below.
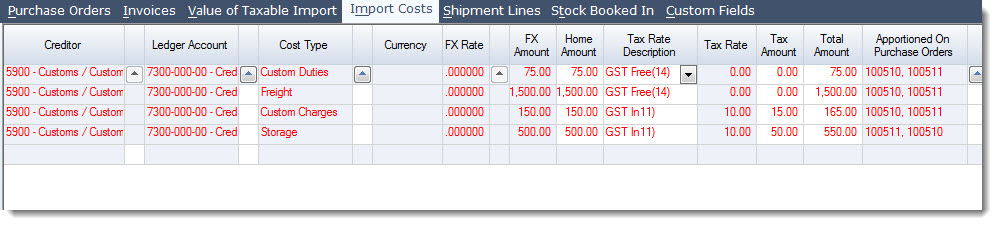
You will notice that each of the cost lines are in RED this is because the costs have yet to be apportioned across the shipment lines.
Apportioning Import Costs
|
|
Prior to booking in your stock it is important that your import costs are entered against the shipment. If you do not have the actual invoices than an estimate of your import costs should be entered. Stock is booked into the system at the calculated landed cost so it is important your costs are as accurate as possible. Import costs can be edited up until the time that the costs are invoiced, if you do edit your import costs Jiwa will;
|
Each import cost line can be apportioned using a different method, once you have selected your apportionment method tick the Apportioned check box next to the cost line.
Repeat this process for each cost line, remember to save your changes
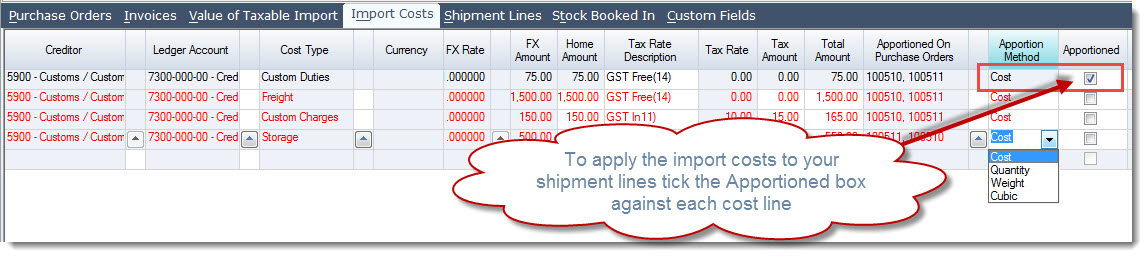
You will notice that as you flag each cost line as apportioned the line will change from RED to BLACK, a visual indicator that the cost has now been applied.
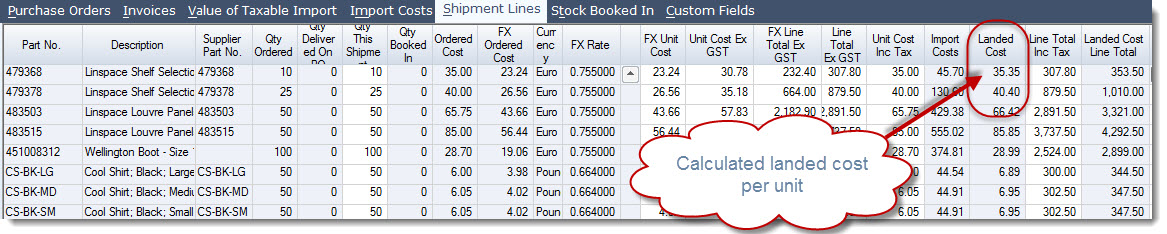
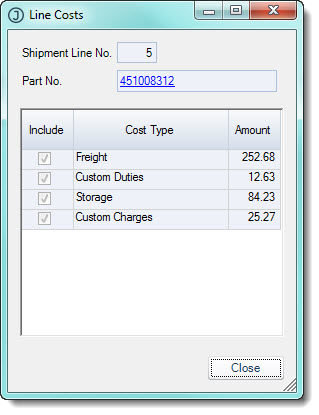
We can now check our landed cost at the individual inventory item level by selecting the Shipment Lines tab.
To view what import costs have been applied to a specific inventory item, move your mouse over the part number you want to check and right mouse click.
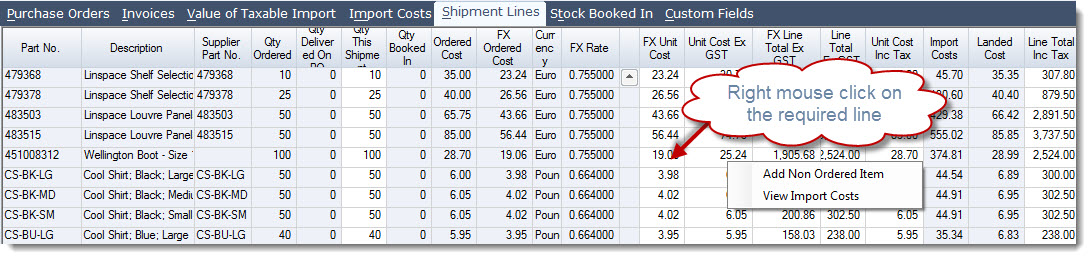
Select View Import Costs for a breakdown of the apportioned costs.
Committing Shipment for Booking In
Once we import costs have been entered and apportioned the shipment can be committed for booking in.
From the menu ribbon select the Commit for Booking In icon
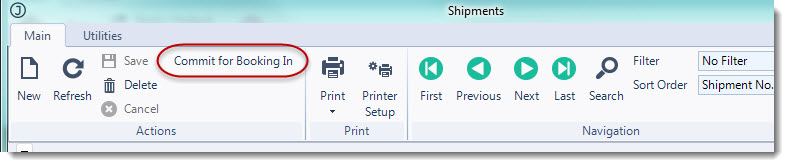
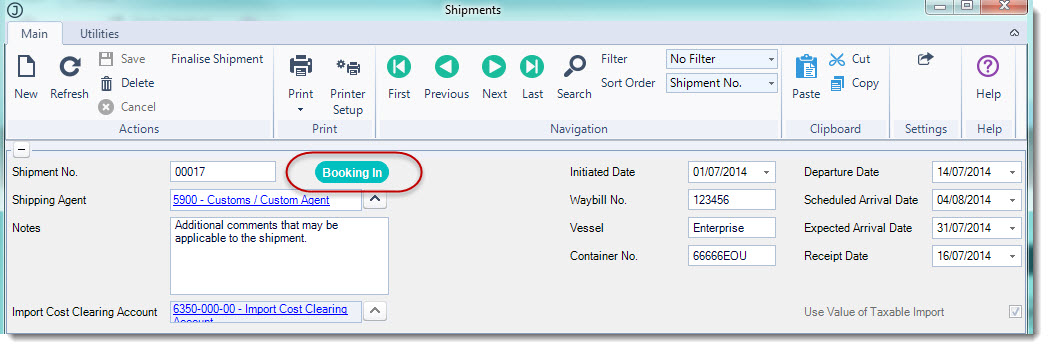
This will change that status of your shipment from Entered to Booking In stock can now be booked in against the shipment
Creating Book Ins
Multiple book ins can be created against a shipment giving you greater flexibility in how stock is received into Jiwa.
Select Purchasing | Landed Cost | Shipment Bookin
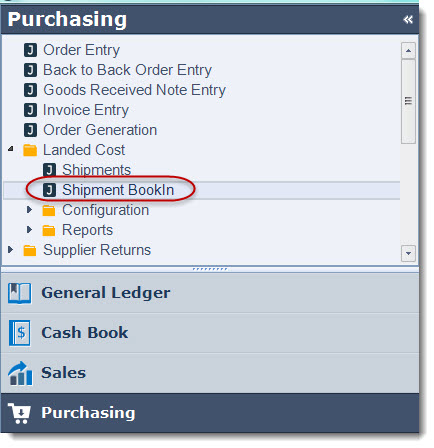
Select New to create a new Bookin
This will bring up the 'Search Shipments' screen
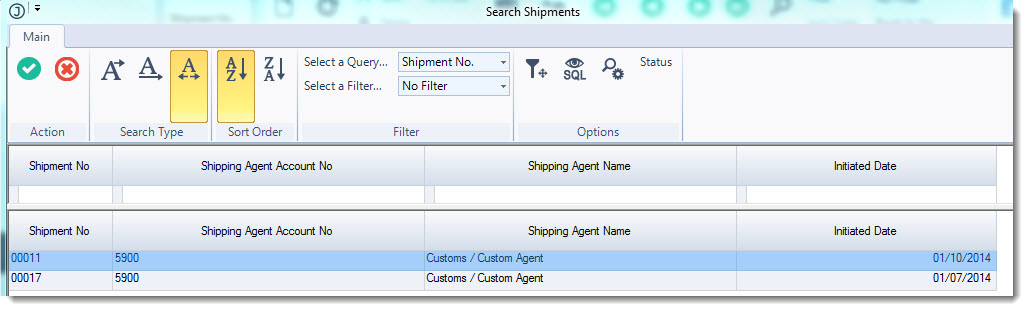
Select the shipment that you want to book stock in against.
The Book In screen is now populated with the items in that shipment
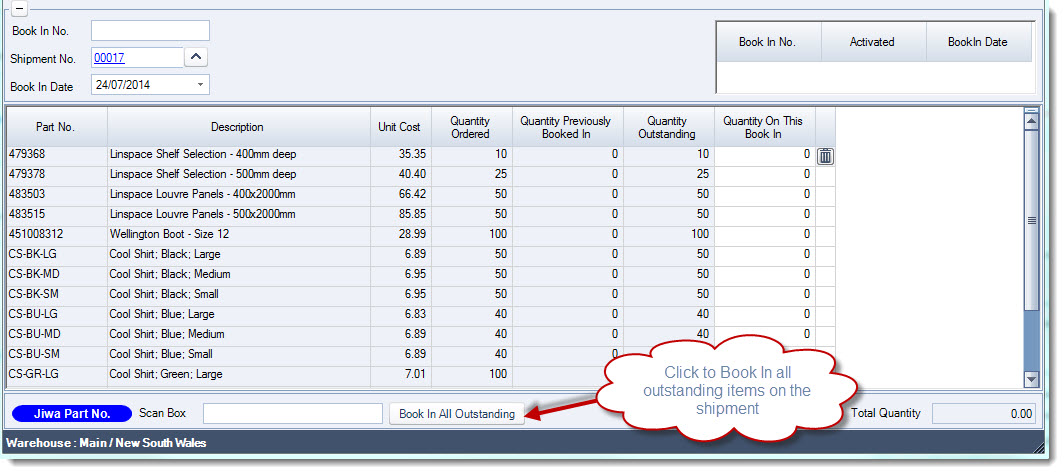
Stock can be receipted in one of the following ways;
-
Clicking the Book In All Outstanding icon at the bottom of the screen
-
Manually typing in the quantity received into the Quantity On This Book In field
-
Double right mouse clicking over the Quantity Outstanding field; or
-
Using the Scan Box field to scan in each item
Enter in your quantity received against the shipment using one of the options above
Save your Book In
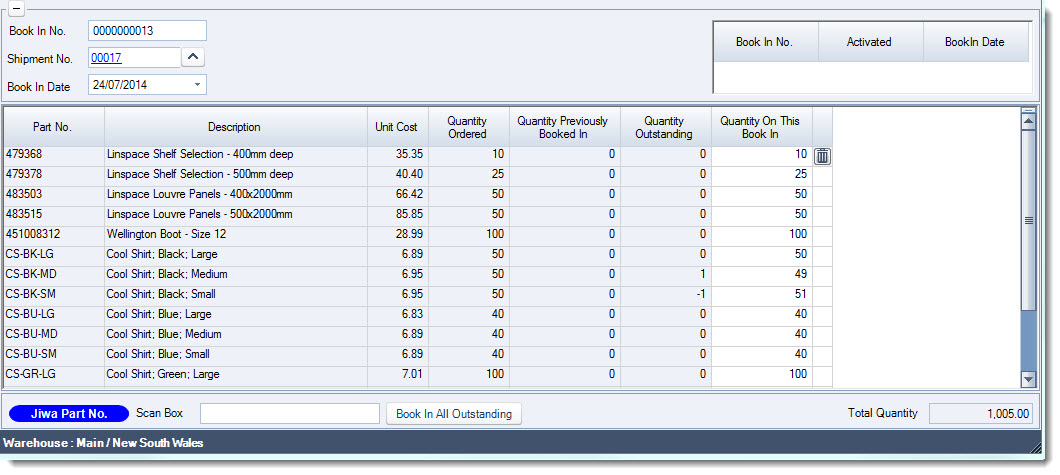
You can continue to work on your Book In until you are satisfied that all stock has been entered correctly.
Once the Book In is finalised select Activate to complete the transaction.

It is only when the Book In is activated that the stock is received into Jiwa and the status of the Book In is changed to Activated no further editing of the Book In is possible.
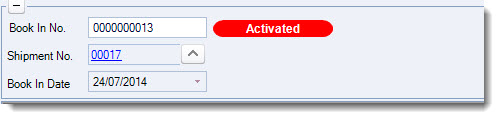
It is also at this point that;
-
The Inventory ledger is updated with the quantities received / Booked In
-
Journal entry is created to take up the stock value and accrued liabilities in the Balance Sheet
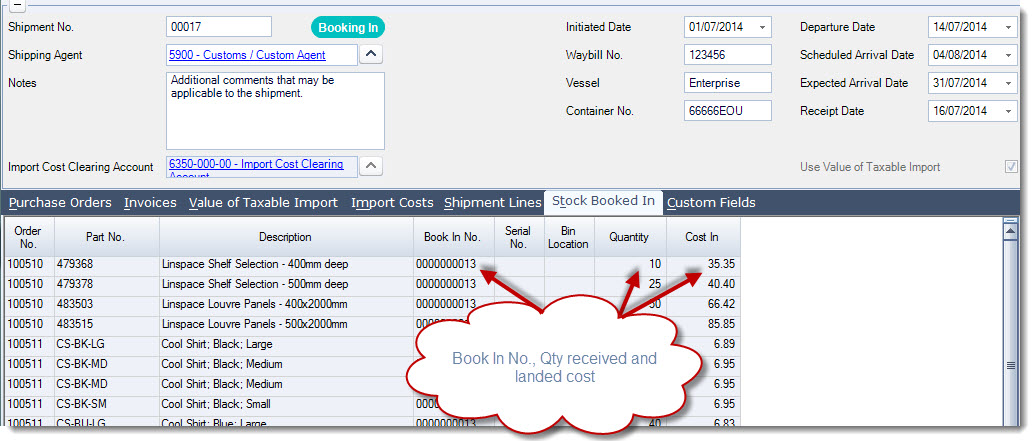
You will now notice that the Stock Booked In tab is now populated with stock that has been received against this shipment.
Repeat this process for each Book In
Finalising Shipment Costs
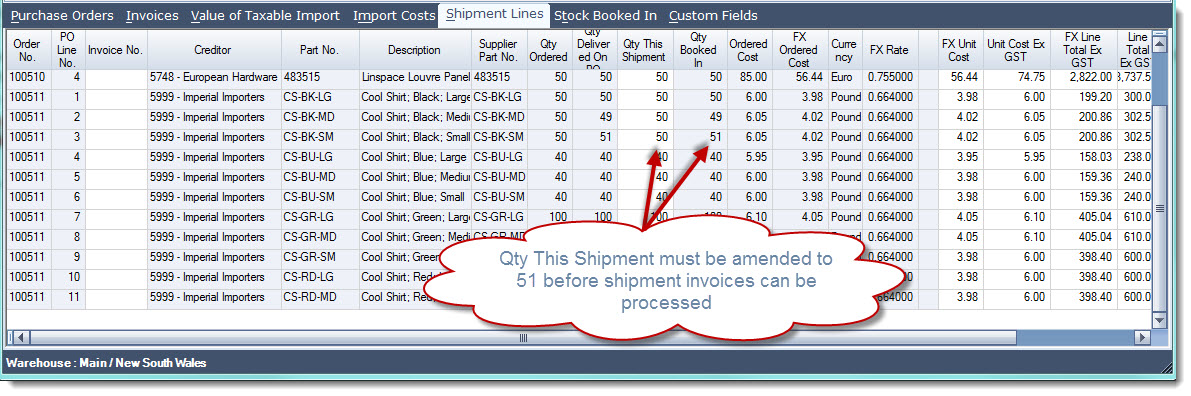
Jiwa allows you to under or over receipt against a shipment however when finalising your shipment costs Jiwa checks to ensure that the Qty Booked In equals the Qty This Shipment.
This is because landed costs are calculated based on the shipment quantity and not the quantity booked in.
You will not be able to invoice the shipment if a variance exists between these to quantities, the Qty This Shipment on the Shipment Lines tab must be amended to match the Qty Booked In.
Once your shipment quantities have been checked against your booked in quantities supplier invoices can be finalised.
Supplier Invoices
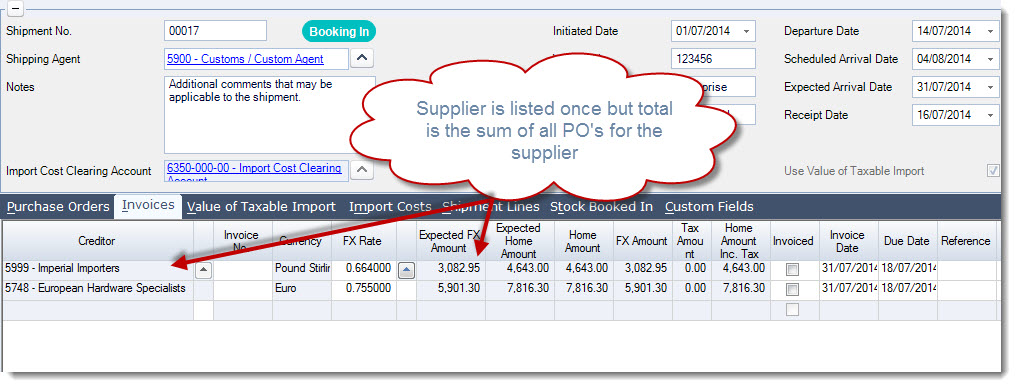
To finalise your supplier invoices move to the Invoices tab on the shipment, you may remember that this was automatically populated for you when you added your purchase orders to the shipment.
Jiwa will only add the supplier once to the invoices tab when the purchase order is brought in. If multiple purchase orders for a single supplier are brought into the shipment, the supplier is still only added once to this tab however the total value expected is recalculated and represents the sum of all the purchase orders for that supplier.
Enter in your invoice number in the Invoice No. field against each supplier

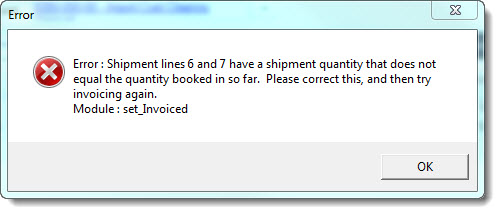
If your shipment quantity does not equal the quantity booked in when you go to set the invoice flag the following message will appear.
You must correct your shipment quantity to equal your booked in quantity before the supplier invoice can be generated.
Confirm your invoice date
Enter in a reference and/or remark if required
To finalise your creditor invoices tick the Invoiced check box. You will notice that once you flag the line as invoiced all fields are greyed out.

Select Save to commit your changes.
It is when you select save that the creditors invoices are created and the shipment invoices that have been flagged as invoiced are disabled from further editing.
If you move to the Shipment Lines tab you will notice that each line is been linked to an invoice and further editing has been disabled.
GST on Import Invoice
The process to finalise your GST on imports invoice is similar to finalising your supplier invoices.
Move to the Value of Taxable Import tab.
Select your Customs Agent / Freight Forwarder Enter in your invoice number in the Invoice No. field
Enter in the GST amount on your imports in the Tax Amount field and confirm the invoice date as per the example below.
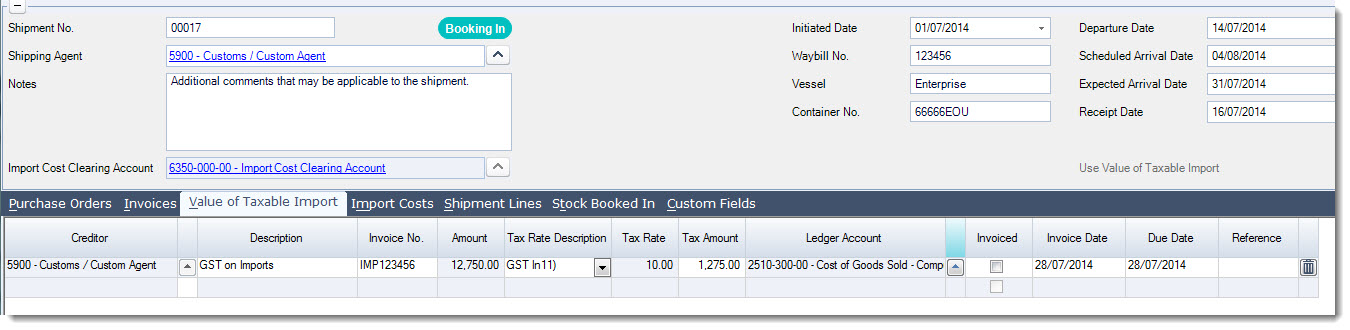
To create the invoice tick the Invoiced check box.

Save to commit your changes and generate the creditors invoice.
|
|
The ledger account can be left to the default account as this is used purely as a clearing account. The net impact in the account will be zero as a debit and credit entry are posted. If you have any questions regarding the journal entries generated by this transaction please contact you Jiwa consultant. |
Import Costs
The process to generate your import cost invoices is the same as your supplier invoices.
Move to the Import Costs tab.
Enter in your invoice number in the Invoice No. field. When the creditor, invoice date and invoice number are the same only a single invoice is posted to the creditor account.
When you are ready to generate the creditor invoices tick the Invoiced check box next to the cost line.
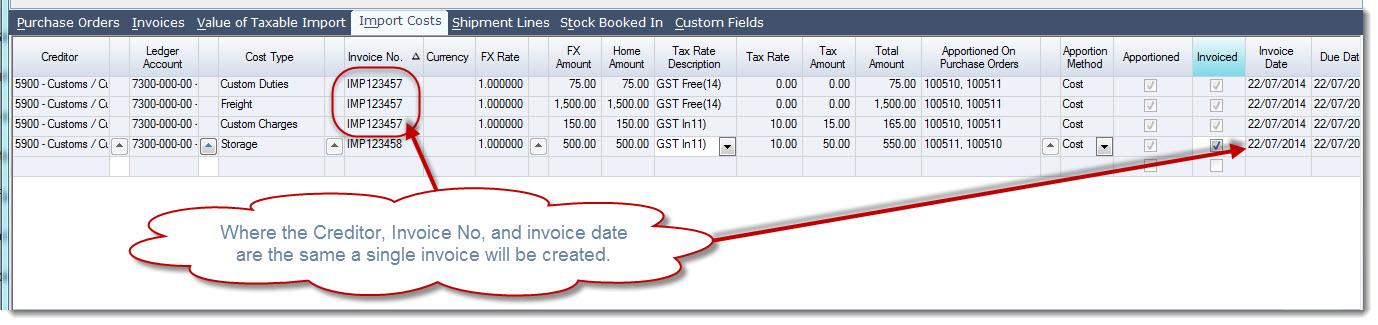
Save to commit you changes and generate the creditor invoice/(s).
Finalising Your Shipment
Once all your shipment costs have been finalised, that is all the creditor invoices have been generated then you are ready to finalise your shipment.
Finalising your shipment will close the shipment and no further editing is possible.
Click on the Finalise Shipment icon from the menu ribbon.

When you have finalised your shipment you will notice that the shipment status will change to Closed.
